

How to Fix CapCut Lag on 4GB RAM: 5 Secret Settings
Introduction
If you are using CapCut Desktop on a 4GB RAM PC, you already know the struggle.
The screen freezes. Playback stutters. Sometimes it even shows “Not Responding.”
I faced the same problem when I started editing on my old laptop. Even adding a second clip made everything slow.
But after trying many settings, I realized something important:
CapCut can run smoothly on a low-end PC — if you use the right settings.
In this guide, I’ll show you the 5 simple changes that helped me fix lag completely.
How to fix CapCut lag on 4GB RAM?
To fix CapCut lag on a 4GB RAM PC, enable hardware acceleration, turn on proxy mode (540p), switch to performance preview mode, clear cache regularly, and close all background apps. These settings reduce CPU and RAM usage and improve editing speed.
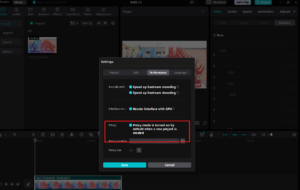
1. Enable Hardware Acceleration (The “CPU Lifesaver”)
Hardware acceleration is the most important setting for low-end PCs. By default, CapCut tries to do all the heavy lifting using your CPU. On an Intel i3 or i5, this causes immediate 100% usage and freezing.
By enabling “Hardware Acceleration,” you force CapCut to share the workload with your GPU (Graphics Card), even if it is just “Integrated Intel HD Graphics.”
How to Enable it Step-by-Step:
- Open CapCut Desktop and look at the top-left corner.
- Click on Menu > Settings.
- Navigate to the Performance tab.
- Find the section labeled “Acceleration”.
- Check both boxes: “Speed up hardware encoding” and “Speed up hardware decoding”.
- Important: Click Save and Restart CapCut for the changes to take effect
💡 Bilal’s Troubleshooting Tip:
If you turn this on and CapCut crashes immediately, it means your Graphics Driver is outdated. Go to the Intel or AMD website and update your drivers; this fixed the issue on my 4GB RAM laptop instantly!
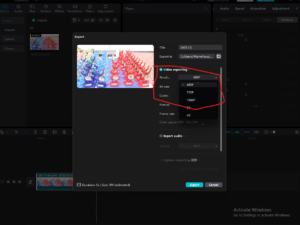
2. How to Use Proxy Mode in CapCut (The #1 Fix for 4GB RAM Lag)
What is a Proxy?
How to Enable Proxy Mode in CapCut Desktop
- Open Settings: Click on Menu > Settings in the top-left corner.
- Go to Performance: Click the Performance tab.
- Toggle Proxy ON: Find the Proxy switch and turn it to ON.
- Set Resolution: Choose 540p (This is the best setting for 4GB RAM).
- Location: Leave the “Proxy Location” as default, but ensure you have at least 5GB of free space on your C: drive.
💡 Bilal’s “Pro” Workflow for 2GB/4GB RAM
- Pre-Proxying: When you import a new video, look at the bottom right of the “Media” window. You will see a small “P” icon or a loading bar.
- Wait for the ‘P’: Do not drag the clip to the timeline until that small “P” icon turns blue or stops loading. This means the Proxy file is ready. If you drag it too early, you will still experience lag.
Why 540p is Better than 720p for Low-End PCs
Summary: Why Every Beginner Needs Proxies
- Zero Playback Lag: Smooth 30/60 FPS while editing.
- Faster Scrubbing: Move through your video instantly.
- No Crashes: Reduces the load on your CPU and Integrated GPU.
3. How to Lower Preview Quality in CapCut (For Lag-Free Playback)
What is “Preview Quality”?
How to Change it in CapCut Desktop
- Open Your Project: Go to the main editing timeline.
- Locate the “Modify” Button: Look at the Player (top right) and click the three lines (Menu) or look for the Modify button in the Project info panel.
- Find “Performance Priority”: Under the Performance settings, look for the “Preview Quality” toggle.
- Select “Performance Mode”: Switch it from “Quality” to “Performance.”

💡 Bilal’s “Low-End PC” Secret: The 1/4 Resolution Trick
- The Workflow: Edit your entire video in Performance Mode. Only switch back to “Quality” for 30 seconds at the very end to check if your color grading or text looks perfect. Then, switch back to Performance before hitting Export.
- The Result: My testing on an Intel i3 laptop showed that “Performance Mode” reduced GPU spikes from 90% down to 45%.
Why “Performance Mode” is Better than “Quality” for Beginners
- Instant Response: When you press the Spacebar, the video starts immediately.
- No Freezing: Even with 5+ layers of text and stickers, the software won’t hang.
- Cooler Laptop: Your laptop fan won’t spin at max speed, preventing your CPU from “throttling” (slowing down due to heat).
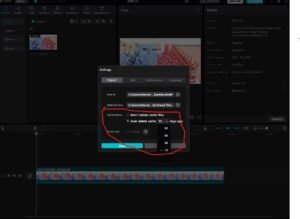
4. How to Clear Cache Files in CapCut (The “No-Crash” Secret)
What is “Cache”?
How to Clear Cache in CapCut Desktop
- Open Settings: Click Menu > Settings in the top-left corner.
- Go to the Project Tab: This is where CapCut manages your files.
- Find the “Cache” Section: Look for the “Auto-delete cache” option.
- Manual Clean: Click the Delete (Trash can icon) next to “Size of cache files.”
- Set an Auto-Limit: I recommend setting “Auto-delete cache” to 30 days or even 15 days for low-end PCs.
💡 Bilal’s “Storage Save” Trick
- Check Before Exporting: I always clear my cache right before I hit the Export button. This ensures CapCut has the maximum amount of “Virtual RAM” (disk space) to render my video without crashing at 99%.
- The 5GB Rule: Always keep at least 5GB of free space on your hard drive. If you go below this, CapCut will lag no matter what settings you use.
Why Clearing Cache is Better for Beginners
- Faster Loading: Your project opens 2x faster.
- Fewer Crashes: Prevents the “Disk Full” errors during rendering.
- System Speed: Frees up space for Windows to run smoothly in the background.
5. How to Optimize Background Apps for 100% RAM Power
The “RAM Budget” Rule
- Total RAM: 4GB
- Windows OS: Uses ~2.2GB
- Google Chrome: Uses ~1.2GB
- Antivirus: Uses ~300MB
- REMAINING for CapCut: Only 300MB! (This is why it lags).
How to Free Up RAM Step-by-Step
Before you open CapCut, do this:
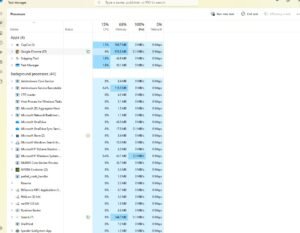
- Press Ctrl + Shift + Esc to open Task Manager.
- Click “More details” at the bottom.
- Look for “Apps” and “Background processes.”
- Right-click on Chrome, Spotify, Discord, or Steam and select “End Task.”
Many apps start automatically when you turn on your PC, stealing RAM in the background.
- In Task Manager, click the “Startup” tab.
- Right-click everything you don’t need (Cortana, OneDrive, Edge) and click “Disable.”
💡 Bilal’s “Super-Speed” Secret: The “Airplane Mode” Hack
- Turn on Airplane Mode: This stops Windows from checking for updates, stops background syncing (like OneDrive or Dropbox), and stops your browser from sending notifications.
- The Result: My testing on an Intel i3 laptop showed a 10% drop in CPU usage just by turning off the Wi-Fi while editing.
Why Closing Apps is Better for Beginners
- Immediate Speed: You will feel the “snappiness” of the timeline instantly.
- No Crashes: Prevents the “Out of Memory” errors.
- Battery Life: Your laptop will stay cool and the battery will last longer.
Summary Checklist for Low-End PCs
| Setting | Recommended Value |
|---|---|
| Proxy | ON (540p) |
| Hardware Encoding | ON |
| Preview Quality | Performance Priority |
| Background Apps | All Closed |
Final Thoughts from Bilal
Frequently Asked Questions
1. Why is CapCut so slow on 4GB RAM?
CapCut is slow on 4GB RAM because video editing requires high memory and processing power. If proxy mode is off and background apps are running, your system runs out of RAM, causing lag and freezing.
2. Does CapCut work on 4GB RAM?
Yes, CapCut can work on 4GB RAM, but only with optimized settings. Using proxy mode, performance preview, and closing background apps makes editing much smoother.
3. What is the best proxy setting for CapCut?
The best proxy setting for low-end PCs is 540p. It gives smooth playback and uses less RAM compared to 720p.
4. Will lowering preview quality reduce export quality?
No, lowering preview quality only affects what you see while editing. Your final exported video will remain in full quality (1080p or higher).
5. How much RAM is recommended for CapCut?
For basic editing, 4GB RAM can work with proper settings. However, 8GB RAM is recommended for smoother performance and handling multiple layers.
6. Why does CapCut crash while exporting?
CapCut may crash during export due to low RAM, full storage, or too many background apps. Clearing cache and keeping at least 5GB free space can help prevent this.
7. Does hardware acceleration improve performance?
Yes, hardware acceleration allows CapCut to use your GPU along with your CPU, which reduces lag and improves playback speed.