
AI Video Editing for Low-End PCs (2026 Guide) You Don’t Need a Better PC — You Need a Smarter Workflow
Your timeline stutters. Your export has been running for 45 minutes. You alt-tab away, come back, and DaVinci Resolve has crashed — again. You close the laptop and think: maybe I just need a better computer.
The creators telling you otherwise are usually the ones with sponsored RTX 4090 builds and no memory of what it felt like to edit on a machine that cost less than a weekend trip. In 2026, some of the most efficient video editing setups aren’t the most powerful — they’re the most intelligent. And intelligence, in this case, means letting AI and the right workflow carry the weight your hardware can’t.
This guide is for anyone editing on a PC with 8–16GB of RAM, integrated or entry-level graphics, and a processor that was never designed to chew through 4K H.265 footage in real time. That includes students making YouTube videos, freelancers producing client content on tight budgets, and creators in markets where a high-end editing rig simply isn’t on the table right now.
What you’ll find here isn’t a list of workarounds or second-best compromises. It’s a complete system — built specifically around the hardware you already have — that covers the tools, the workflow, the AI shortcuts, and the optimisation tricks that actually matter.
Here’s how the guide is structured:
- The problem — why video editing is so demanding, and which hardware constraints matter most
- The system — a hybrid local-and-cloud editing stack designed for low-end machines
- The workflow — a step-by-step proxy pipeline that eliminates lag without spending anything
- The tools — the best AI video editors for low-end PCs in 2026, ranked and compared
- Performance — free optimisation tricks that can cut your export time in half
- Growth — when and what to upgrade first, when you’re ready
By the end, you’ll have a working editing setup — not a plan to build one someday when you can afford a better machine.
Let’s start with why your current setup is struggling, and what you can actually do about it.
You Don’t Need a Better PC — You Need a Smarter Workflow
Your timeline stutters. Your export has been running for 45 minutes. You alt-tab away, come back, and DaVinci Resolve has crashed — again. You close the laptop and think: maybe I just need a better computer.
You don’t.
The creators telling you otherwise are usually the ones with sponsored RTX 4090 builds and no memory of what it felt like to edit on a machine that cost less than a weekend trip. In 2026, some of the most efficient video editing setups aren’t the most powerful — they’re the most intelligent. And intelligence, in this case, means letting AI and the right workflow carry the weight your hardware can’t.
This guide is for anyone editing on a PC with 8–16GB of RAM, integrated or entry-level graphics, and a processor that was never designed to chew through 4K H.265 footage in real time. That includes students making YouTube videos, freelancers producing client content on tight budgets, and creators in markets where a high-end editing rig simply isn’t on the table right now.
What you’ll find here isn’t a list of workarounds or second-best compromises. It’s a complete system — built specifically around the hardware you already have — that covers the tools, the workflow, the AI shortcuts, and the optimisation tricks that actually matter.
Here’s how the guide is structured:
- The problem — why video editing is so demanding, and which hardware constraints matter most
- The system — a hybrid local-and-cloud editing stack designed for low-end machines
- The workflow — a step-by-step proxy pipeline that eliminates lag without spending anything
- The tools — the best AI video editors for low-end PCs in 2026, ranked and compared
- Performance — free optimisation tricks that can cut your export time in half
- Growth — when and what to upgrade first, when you’re ready
By the end, you’ll have a working editing setup — not a plan to build one someday when you can afford a better machine.
Let’s start with why your current setup is struggling, and what you can actually do about it.
Build Your Low-End Editing Stack: Local + Cloud Hybrid
Most guides for low-end PC editing point you at a single tool and tell you to make it work. That’s the wrong frame. No single editor in 2026 is perfectly optimised for both smooth timeline editing and heavy AI processing on modest hardware — because those two tasks have fundamentally different demands.
The solution is a stack: a small set of tools that each do one job well, working together as a system. You use lightweight local software for the editing itself — cutting, trimming, pacing, audio sync — and cloud-based AI platforms for the tasks that would otherwise crush your CPU and RAM. The result is a workflow that’s faster, more capable, and more stable than any single app running alone.
Here’s how the three tiers work.
Tier 1 — Your local editor (the timeline layer)
This is where you spend most of your time. You need something that opens fast, scrubs smoothly on modest hardware, and doesn’t ask your system to do anything heroic just to play back a clip.
CapCut Desktop is the strongest starting point for most creators. It’s free, genuinely optimised for low-RAM machines, handles 1080p projects smoothly on 8GB, and ships with a solid set of AI features built in — auto-captions, background removal, noise reduction — that run efficiently within its own ecosystem.


If your output is primarily social content (YouTube, Reels, TikTok, Shorts), CapCut can often handle your entire workflow without needing the other tiers at all.
Clipchamp is the right pick if you’re on Windows 11 and want zero installation friction. It’s built into the OS, runs in a browser window, and has quietly become a capable editor for straightforward projects. Its text-based editing feature — where you cut video by editing a transcript — is genuinely useful for talking-head content and saves significant time on low-end machines where scrubbing a timeline is slow.
Shotcut fills the gap if you need open-source, no watermark, and broader format support. It’s not as polished as CapCut, but it’s remarkably lightweight, supports GPU acceleration on compatible hardware, and handles a wider range of input codecs without complaint.
For most readers of this guide, the recommendation is simple: start with CapCut for social-first content, or Clipchamp if you’re on Windows and value simplicity. Graduate to Tier 2 when you need more control.
Tier 2 — DaVinci Resolve Free (the control layer)
DaVinci Resolve is professional-grade software that happens to be free, and it runs on low-end hardware — with the right approach. That approach is the proxy workflow, which gets its own dedicated section (Section 3) because it’s the single most impactful thing you can do for performance on a modest machine.
The short version: instead of editing your original heavy footage directly, Resolve generates lightweight lower-resolution copies called proxies, edits against those, and then automatically switches back to your original files at export. Your timeline becomes smooth because it’s playing back small, easy-to-decode files. Your final export is full quality because it’s rendered from the originals.
This workflow is the reason Resolve belongs in a low-end PC stack at all. Without it, Resolve on 8–16GB RAM with integrated graphics is a frustrating experience. With it, it’s a capable professional environment.
Use Resolve when your project demands more than Tier 1 can offer: multi-track colour grading, advanced audio work via the Fairlight page, detailed timeline control, or output for clients who expect a certain production standard. The learning curve is real, but the proxy workflow removes the hardware barrier — the main reason most low-spec creators avoid it.
Tier 3 — Cloud AI tools (the heavy lifting layer)
This is where you offload the tasks that would otherwise require hardware you don’t have. Cloud-based AI platforms run their processing on remote servers — which means your PC’s RAM, GPU, and CPU are irrelevant. You upload, the platform processes, you download.
Kapwing is the most versatile option here. It handles auto-subtitling, background removal, noise cleaning, video resizing for multiple platforms, and basic AI editing — all in a browser. The free tier is usable; the paid tier unlocks longer exports and removes watermarks.
Pictory is purpose-built for repurposing long-form content. If you record long YouTube videos, podcasts, or talking-head content, Pictory can automatically identify highlight clips, generate captions, and produce short-form cuts without you touching a timeline. For creators managing high output volume on a slow machine, this is a genuine time-saver.
CapCut Online extends the desktop app’s AI features into the browser. If you’re already using CapCut for editing but your machine struggles with its heavier AI tools locally, the online version runs identical features server-side — no local processing required.
The principle across all three: anything that requires significant AI computation — upscaling, generative effects, batch processing, transcript-based editing — belongs in Tier 3. Save your machine for the creative decisions.
How the tiers connect in practice
A typical project flow looks like this:
You shoot or record your footage. You bring it into your Tier 1 editor (CapCut or Clipchamp) for the rough cut — basic trimming, sequencing, music sync. If the project is simple, you export from here and you’re done.
For more complex projects, you move the cut into DaVinci Resolve (Tier 2), generate proxies, and do your fine editing, colour work, and audio polish there. Meanwhile, you send any AI-heavy tasks — caption generation, background replacement, noise removal — to your Tier 3 cloud tool of choice, then bring the processed files back into Resolve for final assembly.
At export, Resolve renders against your original high-quality footage. Your machine handles the render overnight if needed, or you export a compressed proxy version for review and render the master when time allows.
The system scales with your project. Simple jobs never leave Tier 1. Complex jobs use all three. Either way, your machine is never asked to do more than it can handle.
What this stack costs
Everything described above has a usable free tier:
- CapCut Desktop — free, no watermark on most exports
- Clipchamp — free, included with Windows 11
- Shotcut — free and open-source, no watermark
- DaVinci Resolve Free — free, with full proxy workflow support
- Kapwing — free tier available (watermark on exports; paid from ~$16/month)
- Pictory — free trial; paid plans from ~$19/month
- CapCut Online — free with account
You can build a complete, professional-quality editing pipeline for zero cost. The paid cloud tools are worth considering once your output volume justifies them — but they’re never required to get started.
The workflow — step-by-step proxy + AI pipeline
A proxy-first workflow is one of the most effective techniques for editing video smoothly on a slow or low-end PC, especially when working with heavy 4K footage or high-bitrate smartphone recordings. Instead of forcing your system to process large original files in real time, you create lightweight proxy versions of your media that act as temporary placeholders during editing. In DaVinci Resolve, this process begins by importing your footage into the media pool and generating proxy media using optimized formats like ProRes Proxy or DNxHR LB, while avoiding H.264 or H.265 proxies because they can still cause performance issues. These proxy files are typically created at half or even quarter resolution, significantly reducing CPU and GPU load. Once generated, you enable proxy mode in the timeline, allowing the editor to switch seamlessly to low-resolution playback, which eliminates lag, stuttering, and timeline freezing. For more complex projects with effects, transitions, or color grading, render cache is activated so the software pre-renders heavy sections, ensuring smooth preview performance without constant recalculation. After completing the edit using proxy media, the final export is always done using the original high-quality files, preserving full resolution and detail. A useful professional tip is to use the Blackmagic Proxy Generator app, which automatically creates optimized proxies in the background and prevents the editing software from freezing during processing. This workflow effectively separates editing performance from file heaviness, making it possible to handle even demanding 4K projects on machines with limited RAM and weaker processors.
🧠 The Best AI Video Editors for Low-End PCs in 2026 (Ranked Comparison)
AI-powered video editing has completely changed how creators work on low-end PCs. In 2026, you no longer need a high-end GPU or expensive workstation to produce professional content. Modern AI editors now handle tasks like auto-captioning, scene detection, noise removal, and even smart cutting, reducing manual workload and system strain. However, not all tools perform equally well on weak machines. Some are optimized for low RAM environments, while others require proxy workflows or cloud support to stay smooth. Below is a detailed comparison of the best AI video editors for low-end PCs, based on performance, AI capability, and real-world usability.
⭐ 1. CapCut PC (Best Overall for Low-End AI Editing)
CapCut PC stands out as the most balanced AI video editor for low-end systems in 2026.
✔ Best for:
- TikTok, YouTube Shorts, Instagram Reels
- Fast AI-assisted editing
- Beginners and intermediate creators
⚙ Why it works on low-end PCs:
CapCut is optimized with lightweight rendering engines and cloud-assisted AI processing. Even on 4GB–8GB RAM systems, it maintains smooth playback when preview resolution is reduced.
🤖 Key AI Features:
- Auto captions with high accuracy
- AI background removal
- Smart cut (removes silence automatically)
- Template-based video generation
⚠ Limitation:
- Heavily template-driven workflow
- Less control compared to professional editors
👉 CapCut is ideal if your focus is speed and viral content creation rather than deep manual editing.
🎬 2. DaVinci Resolve Free (Best for Professional Proxy Workflow)
DaVinci Resolve is the most powerful free editing software, but it requires a structured workflow to run smoothly on low-end PCs.
✔ Best for:
- Professional video editing
- Color grading
- Long-form content
⚙ Why it works on low-end PCs:
Although heavy by default, DaVinci Resolve becomes usable on weak systems through a proxy-first workflow, where low-resolution media is used during editing instead of original files.
🤖 Key AI Features:
- AI face refinement tools
- Smart reframing
- Scene cut detection
- Auto color matching
⚠ Limitation:
- Steep learning curve
- Requires setup optimization (proxy media, render cache)
👉 This is the best option if you want Hollywood-level control on a budget system.
☁️ 3. Clipchamp (Best Browser-Based AI Editor)
Clipchamp is a cloud-based editor built into Windows systems, making it extremely lightweight.
✔ Best for:
- Ultra low-end PCs
- No installation setups
- Quick edits and presentations
⚙ Why it works on low-end PCs:
Since most processing happens in the browser and cloud, local system load is minimal, making it ideal for weak machines.
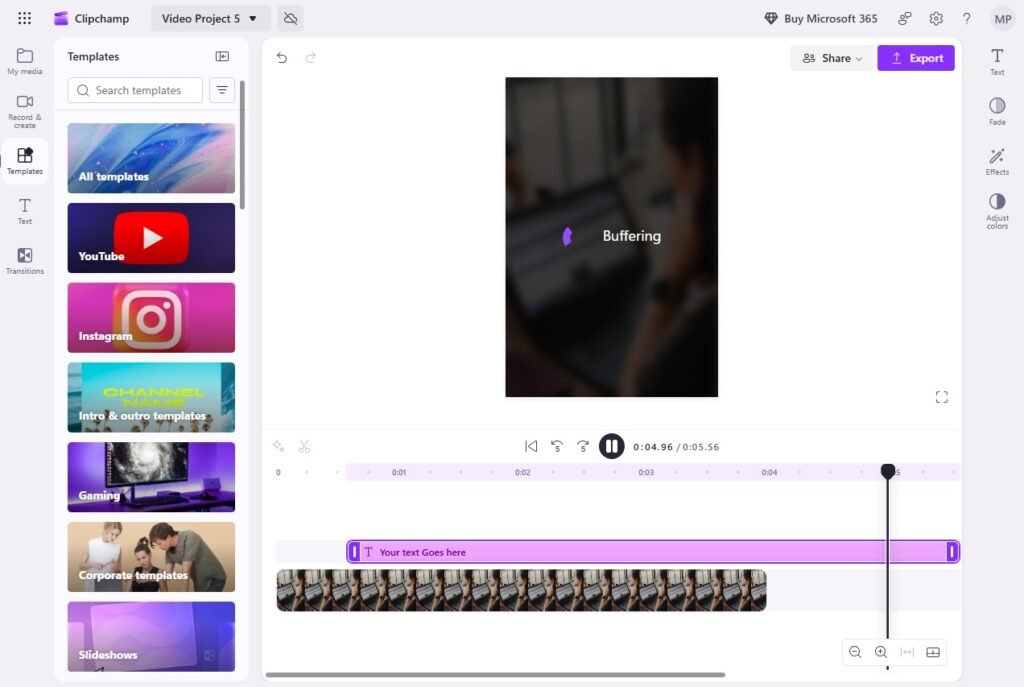
🤖 Key AI Features:
- Text-to-video generation
- Auto subtitles
- Stock media suggestions
- Simple drag-and-drop editing
⚠ Limitation:
- Requires stable internet
- Limited advanced editing control
👉 Clipchamp is perfect for users who want “no stress editing” without hardware dependency.
⚡ 4. Movavi Video Editor (Lightweight AI Editing Tool)
Movavi is known for being one of the most optimized desktop editors for low-end PCs.
✔ Best for:
- Smooth editing on weak hardware
- Beginner-friendly AI tools
- YouTube creators
⚙ Why it works on low-end PCs:
Movavi uses lightweight rendering and optimized GPU usage, making it efficient even on integrated graphics systems.
🤖 Key AI Features:
- One-click video enhancement
- Background noise removal
- AI stabilization
- Auto scene detection
⚠ Limitation:
- Paid software after trial
- Limited advanced VFX tools
👉 Movavi is ideal for creators who want simplicity with stable performance.
🧩 5. Shotcut (Best Open-Source GPU-Accelerated Editor)
Shotcut is a free, open-source editor that performs surprisingly well on low-end systems when GPU acceleration is enabled.
✔ Best for:
- Advanced users on a budget
- Open-source workflow
- Custom editing control
⚙ Why it works on low-end PCs:
Shotcut supports GPU acceleration and does not include heavy background processes, making it lightweight compared to mainstream editors.
🤖 Key AI Features:
- Basic AI filters (limited compared to CapCut/Movavi)
- Advanced manual editing controls
- Flexible codec support
⚠ Limitation:
- No built-in AI automation
- Less beginner-friendly
👉 Shotcut is best for users who prefer control over automation.
📊 AI Video Editor Comparison Table (2026)
| Tool | RAM Requirement | GPU Needed | AI Features | Free Version |
|---|---|---|---|---|
| CapCut PC | 4GB–8GB | Optional | ⭐⭐⭐⭐⭐ | Yes |
| DaVinci Resolve | 8GB+ | Recommended | ⭐⭐⭐⭐ | Yes |
| Clipchamp | 4GB+ | No | ⭐⭐⭐⭐ | Yes |
| Movavi | 4GB–8GB | Optional | ⭐⭐⭐⭐ | Trial |
| Shotcut | 4GB+ | Optional | ⭐⭐⭐ | Yes |
🧠 Final Insight
In 2026, the best AI video editor is not defined by raw power but by how efficiently it uses system resources.
- CapCut dominates for speed and AI automation
- DaVinci Resolve dominates for professional workflow
- Clipchamp dominates for accessibility
- Movavi dominates for stability
- Shotcut dominates for control
👉 The real advantage comes from choosing the right tool for your system, not the most advanced one.
⚡ Performance Optimization Tricks: Make Your PC Edit Faster Without Spending a Penny (2026 Guide)
Video editing performance is not only determined by your hardware. In many cases, slow playback, timeline lag, and long export times come from inefficient software settings and workflow mistakes rather than weak specifications. In 2026, even low-end PCs can handle smooth editing if you apply the right optimization techniques used in professional post-production environments. These methods focus on reducing system load, improving caching efficiency, and minimizing real-time rendering pressure so your editor runs faster without upgrading hardware.
🧩 1. Lower Timeline Preview Resolution
One of the most effective ways to instantly reduce lag in editing software like DaVinci Resolve is to lower the playback resolution.
Instead of editing at full quality:
- Set timeline preview to 1/2, 1/4, or even 1/8 resolution
This reduces GPU and CPU workload significantly because the system processes fewer pixels during playback. It does not affect final export quality, only preview performance.
⚙️ 2. Enable Render Cache for Heavy Clips
Render cache allows your editing software to pre-render complex sections of the timeline.
In DaVinci Resolve:
- Enable Smart Render Cache
- Use cache for Fusion effects, transitions, and color grading nodes
This prevents the system from recalculating effects in real time, which is one of the main causes of lag on low-end PCs.
💾 3. Use SSD for Cache Storage (Not HDD)
Storage speed directly affects editing performance.
Best practice:
- Store project files and cache on an SSD
- Avoid using traditional HDDs for active editing
SSDs drastically reduce:
- Scrubbing delay
- Media loading time
- Cache writing bottlenecks
Even a basic SSD improves performance more than upgrading RAM in many cases.
🧠 4. Close Background Applications During Editing
Background processes silently consume CPU and RAM resources.
Before editing:
- Close browsers with multiple tabs
- Disable unnecessary startup apps
- Stop background updates and antivirus scans temporarily
This frees system resources for your editing software, improving responsiveness and playback smoothness.
🎛️ 5. Disable Heavy Effects While Cutting
Effects like:
- Motion blur
- Noise reduction
- Stabilization
- Heavy color grading nodes
can significantly slow down real-time playback.
Professional workflow:
- Cut and structure the video first
- Apply effects only in the final stage
This separates “editing phase” from “processing phase,” improving efficiency.
📁 6. Use Proxy or Offline Mode for Social Media Editing
Proxy mode replaces heavy original files with lightweight versions during editing.
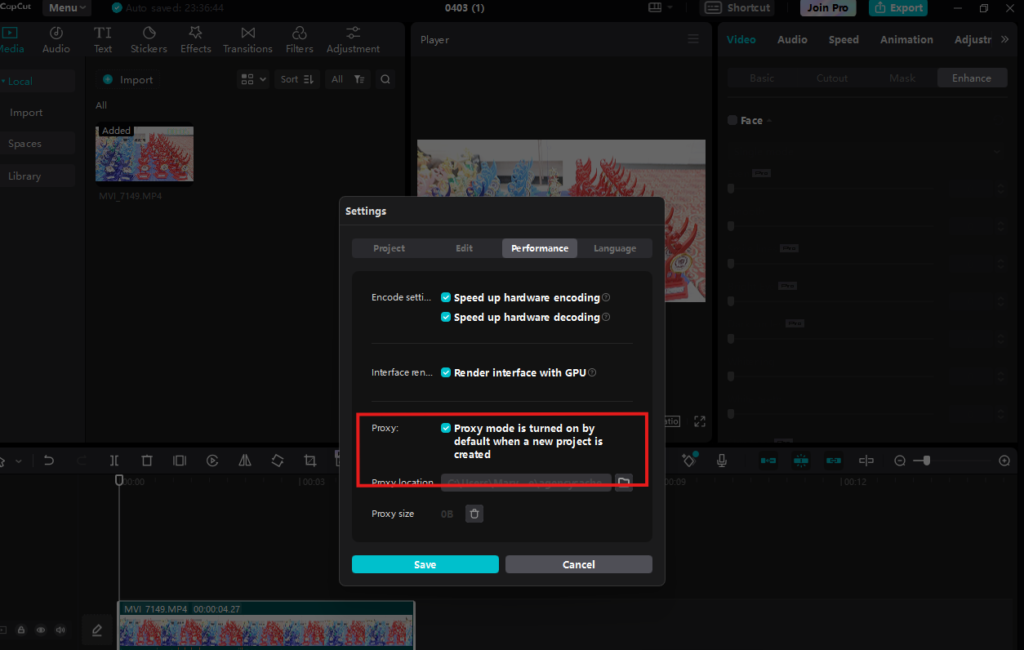
Benefits:
- Smooth playback on low-end PCs
- Faster scrubbing
- Reduced freezing on 4K footage
In DaVinci Resolve or similar tools, enable:
- Proxy media
- Offline mode for heavy clips
This is essential for editing TikTok or YouTube Shorts content efficiently.
🎞️ 7. Prefer Optimized Formats for Timeline Media
Not all video formats are equal in performance.
Better for editing:
- AVI
- MOV (ProRes or DNxHR codecs)
Avoid during timeline editing:
- H.265 (HEVC)
- Highly compressed mobile formats
H.265 requires heavy decoding, which increases CPU load and causes lag on weak systems.
☁️ 8. Use Cloud-Based AI Editors for Heavy Tasks
Modern cloud tools reduce hardware dependency completely.
Examples:
- CapCut Web
- Kapwing
- Online AI video editors
These platforms process:
- Auto captions
- Scene detection
- AI cuts
on remote servers, meaning your PC is only handling display tasks, not processing.
🚀 When to Upgrade — and What to Prioritise First (Video Editing PC Guide 2026)
Upgrading your system for video editing is not always about buying the most expensive hardware. In most cases, performance problems come from a specific bottleneck—either memory, storage, or GPU processing. The key is to identify the weakest link first and upgrade strategically for the highest return in performance.
🧠 Step 1: If RAM is below 16GB → Upgrade RAM First (Highest ROI)
If your system has 8GB RAM or less, this is your biggest limitation.
Symptoms:
- Timeline freezes during playback
- Apps crash when multiple layers are used
- Slow multitasking while editing
✔ Priority upgrade:
- Increase RAM to 16GB minimum (32GB ideal for heavy editing)
Why this matters:
Video editing software like DaVinci Resolve and CapCut PC rely heavily on memory for caching frames and processing effects. More RAM directly reduces lag and improves timeline responsiveness more than any other upgrade.
🎮 Step 2: If You Edit 4K on Integrated Graphics → Upgrade GPU
If your system struggles with 4K footage and has no dedicated GPU, this becomes the next priority.
Symptoms:
- Playback stuttering even with proxies
- Slow rendering of effects
- High CPU usage during preview
✔ Recommended entry-level GPUs:
- GTX 1050 Ti (4GB)
- GTX 1650 (better efficiency option)
Why this matters:
A dedicated GPU handles:
- Real-time rendering
- Effects processing
- Playback decoding
This significantly reduces CPU pressure.
💾 Step 3: If Export Speed is Slow → Upgrade to SSD
If editing is smooth but exports are slow or project loading is delayed, storage is your bottleneck.
Symptoms:
- Long export times
- Slow project opening
- Lag when scrubbing timeline
✔ Upgrade:
- Switch from HDD → SSD (SATA or NVMe)
Why this matters:
SSDs improve:
- Read/write speed
- Cache processing
- Media loading time
Even a basic SSD upgrade can feel like a “new PC” for editing workflows.
☁️ Bonus: Delay Hardware Upgrades Using AI Tools
Modern AI-based editors like CapCut Web and cloud platforms reduce system load by handling:
- Auto captions
- Scene detection
- Rendering tasks in the cloud
This means you can continue editing efficiently without immediate hardware investment.
🧭 Final Insight
You don’t need to upgrade everything at once. The smartest approach is sequential optimization:
- Low RAM → upgrade memory first
- 4K lag → add GPU next
- Slow exports → switch to SSD
Each upgrade removes a specific bottleneck, improving overall performance step by step.
The workflow you already use today still works—but every upgrade you make simply accelerates it, making editing smoother, faster, and more professional over time.
🎬 Conclusion + SEO Summary: You’re Ready to Edit — Hardware Excuses Eliminated
In 2026, video editing is no longer limited by expensive hardware. With AI-powered tools, proxy workflows, and optimized editing settings, even a low-end PC can produce professional-quality content without lag or crashes. The real difference is not your machine—it is your workflow.
To summarize the system: mobile and cloud AI tools handle heavy processing tasks like auto captions and scene detection, CapCut and Clipchamp provide fast beginner-friendly editing environments, and advanced users can scale into DaVinci Resolve using proxy workflows for full professional control. Each tool fits a different stage of your growth, allowing you to improve without immediate hardware upgrades.
For beginners, the best starting point is CapCut or Clipchamp because they are lightweight, AI-assisted, and optimized for fast content creation. As your skills grow, transitioning into DaVinci Resolve with a proxy-first workflow unlocks professional-level editing without requiring a high-end PC.
❓ FAQs (People Also Ask)
1. Can I do AI video editing on a low-end PC in 2026?
Yes, tools like CapCut and cloud-based editors handle AI processing externally, allowing smooth editing even on weak systems.
2. What is the best free video editor for beginners?
CapCut and Clipchamp are the best free options due to their AI tools and low system requirements.
3. Do I need a gaming PC for video editing?
No, with proxy workflows and optimized settings, even basic laptops can handle modern video editing efficiently.
Ping Back: